Tuesday, November 24, 2009

Where is Jack LaLanne when you really need him?


This post has been a niggling thought in the back of my head since I saw a piece on "Squeezing the Truths out of Juice Myths" on CBS The Early Show last week. The story bothered me when I saw it, but I ignored it and it's been festering like a splinter ever since.

This is a line from the story as posted on the Early Show website:

"Dr. Jennifer Ashton debunked myths about the health benefits of juice. In some cases, juices have more calories than soda."

I need to add a Dave Barry-like disclaimer here: I'm not making this up.

Say what? Since when is number of calories the determining factor in terms of whether or not a food is good for you?

Am I the only one who thinks it is dangerous for a "doctor" to be telling parents that soda is better for their children than juice because it has fewer calories?

Here's an excerpt from the show transcript:

A cup of apple juice, she said, can contain 117 calories while a cup of cola contains just 91 calories and is also less caloric than orange juice (105 calories). A cup of grape juice has 154 calories. There's also more than 37 grams of sugar in a glass of grape juice, compared with cola's 22 grams. "If you just go by calorie to calorie and put them head to head...you could be getting a lot more bang for the buck in terms of calories, obviously sugar, in the juice versus the soda," Ashton said.

Maybe there is some validity to the problem of parents giving their children too much of a good thing, but why not just tell them to try and get their kids to drink more water instead of making it look like - in a comparison between soda and juice - soda might be a better choice?

I'm pretty sure this is the same woman who tried to tell us a month or so ago that Fruit Loops contain an arsenal of antioxidants. http://cookingoutloud.blogspot.com/2009/08/is-there-some-conspiracy-to-keep-us.html

Stories like these make me wonder who is paying for these "studies."

Monday, November 16, 2009

Scenes from the Southside

My mother fixed chicken many ways - roasted, fricasseed, chicken and dumplings - but frying was never part of her repertoire.

Before I met William, my idea of fried chicken was the stuff that the Colonel sells by the bucket.

Every summer we would drive from New Jersey to visit my grandmother in Florida.
Some of my fondest memories are of blistering August afternoons sitting on the beach in Dunedin turning various shades of red and eating volumes of original recipe and extra crispy. Wet naps were optional, sand was not.


The first time we visited William's hometown in North Carolina after we were married, my concept of fried chicken changed forever.

From my first bite of Parker's fried chicken in Greenville I knew I would never eat chicken from a bucket ever again unless I was desperate. And then there were the corn sticks and the hush puppies!


Since it was my first time meeting my husband's extended family, half the population of the state dropped in to visit every day we were there (I started to feel as if I was being vet-checked and wouldn't have been surprised if someone had asked if they could take a look at my teeth). But the good news was, everybody that came to see us, brought food.

I was in hog heaven. Not only did I experience chicken enlightenment, I had my first East Carolina pulled pork barbecue sandwich and decided that Farmville had to be close to Nirvana. How could it not be with Jack Cobb's at one end of town and Contentnea Creek BBQ on the other?


I may never be able to replicate Aunt Ann's marvelous turkey gravy with pieces of hardboiled eggs, but, after much trial and error, I can fry a mean piece of chicken.


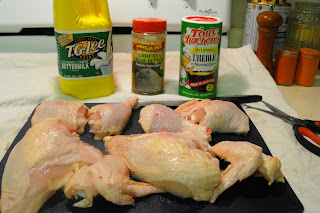
Buttermilk fried chicken


Ingredients:

1 3-4 pound fryer

1 cup buttermilk

2 tablespoons Creole seasonings

(Tony Chachere’s or Zatarain’s)

1 teaspoon black pepper

2 cups unbleached all purpose white flour

Directions:

Cut the chicken into 8 pieces, removing the backbone.

Put the buttermilk, seasoning and pepper into a gallon-sized Ziploc bag and mix well.

Add the chicken, close the bag and turn it over a few times to coat the chicken with the mixture then put the bag of chicken in the refrigerator to marinate for at least two hours or overnight.

Put the flour in a plastic bag or large bowl. Remove the chicken pieces one at a time and shake in the bag or dredge in the flour in the bowl to coat.


Place on a baking sheet and let the coated chicken sit in the refrigerator for at least 20 minutes. If the coating is wet, shake or dredge in the flour for a second time (makes a crispier coating).


Gently shake off the excess flour and deep fry four pieces at a time for 20 minutes, starting with the legs and thighs. Place the first four pieces on a baking sheet in a warm oven while the second batch is frying.


Carolina On My Mind...

Saturday, November 14, 2009

Tourte reform


When I die and go to heaven, I'm going to have a Sub-Zero refrigerator and a Viking gas stove.


I have a confession to make. I hate my kitchen.


Under no circumstances will I ever buy another smooth surface electric range. The front right burner has two settings that work - el scorcho and not hot enough. The white porcelain has darkened over the burners and, no matter how hard I try, they never look clean any more.


The oven is fickle and runs sometimes too hot, and sometimes not, which makes baking somewhat of an adventure.


My refrigerator never seems to have enough room.


The sinkhole is making the kitchen floors wavy and my cabinet doors gape annoyingly open.


I try to look at things from the perspective of the lyrics of a Sheryl Crow song:


"It isn't having what you want, it's wanting what you've got."


But I can dream.


What does any of this have to do with the recipe?


Well, not much.


I've been watching cooking shows on TV for a very long time and I'm starting to become a little disappointed in the offerings on the Food Network.


In my opinion, the shows seem to be less about food and more about personalities and selling cookware or knicknacks - like Semi-Homemade - or create dishes using equipment and ingredients no home cook realistically has access to - like Iron Chef. (When was the last time you saw squab or sea urchin at the grocery store?)


The other day we were flipping through the channels and came across an old Julia Child series on PBS.


Julia was all about the food and never seemed to rely on fancy gagets or equipment. She created her masterpeices with quality ingredients, a serviceable stove, a few good pots, pans and knives and a copper bowl and a whisk.


Tourte Milanese adapted from the PBS series In the Kitchen with Julia - Episode: Puff pastry with Michel Richard

Ingredients:

1 pound puff pastry
1 tablespoon olive oil
1 tablespoon butter
1 pound fresh spinach (blanched, chopped, and drained very well)
2 cloves garlic, minced
½ teaspoon freshly grated nutmeg
salt and ground black pepper, to taste
2 large roasted red bell peppers
8 extra large eggs
2 teaspoons chopped chives
2 teaspoons chopped flat leaf parsley
1 teaspoon chopped fresh tarragon
salt, to taste
2 tablespoons butter
½ pound thinly sliced Swiss cheese
½ pound thinly sliced ham
soft butter to grease pan
1 beaten egg for egg wash

Directions:

Grease an 8-inch spring form pan with soft butter. Roll out ¾ of the puff pastry ¼ inch thick and line bottom and sides of pan leaving a 1-inch overhang. Roll out the remaining pastry into ¼ inch thick and cut out 8-inch circle. Transfer into a plate. Keep both pastries refrigerated while preparing the filling.


To roast peppers: If you have a gas stove, turn one burner on low to medium and place pepper directly on the flame to char the outside skin and soften the pepper. Keep turning the pepper until all sides are charred. Put the peppers in a paper or plastic bag to steam then peel the charred skin from the pepper and remove the stem and seeds.
The peppers can be roasted the same way on an outdoor gas or charcoal grill or in an electric oven set to broil.

Heat oil and butter in a large skillet. Add spinach and garlic and saute for 2 minutes. Season to taste with salt, pepper, and nutmeg. Remove from heat, set aside.

To make the omelets, whisk four eggs in a bowl then add half of the herbs and salt to taste. Melt 1 tablespoon of butter in an 8-inch skillet over medium heat, coating the bottom of skillet evenly. Pour the egg mixture and stir briefly. As eggs start to set, lift edges
so liquid can run under. When eggs are completely set but still moist, transfer omelet onto a plate. Repeat with the remaining eggs and herbs.
Remove the lined pan from the refrigerator.

Layer ingredients in following order: 1 omelet, half of the spinach, half of cheese, half of ham, all of the red bell peppers. Repeat layering in reverse order using the remaining ingredients.

Remove the 8-inch pastry from refrigerator and place over omelet. Seal well to pastry lining by pinching together with fingers. With tip of knife, draw desired number of slices directly on the pastry. Make a small hole in the center of the pastry. Brush all over with beaten egg. Refrigerate for 30 minutes.

Position rack in lower third of oven, preheat to 350 degrees F.

Brush pastry one more time with beaten egg. Place pan on a baking sheet and bake until golden brown, about 1 ½ hours. Cool for 30 minutes, release from pan. Slice and serve warm.


A couple of tips on using frozen puff pastry:
Don't let the pastry get too warm when you thaw it or you will have a hard time getting the packaging off and rolling it out.
If you don't let it thaw enough, it will crack when you unroll it.